Showing posts with label ESX. Show all posts

Friday, May 4, 2012

Lab Manager ESX 4.1 Host can’t join back into Lab Manager, reporting error “Host is entering maintenance mode”

Recently upon pushing patches to our ESX 4.1 and ESXi 4.1 hosts, I was unable to re-enable 2 of our 23 blades.  We had one of each flavor, ESX and ESXi.  After much frustration I found our KB 1026364, which says:

===================================================

To resolve this issue, restart the Lab Manager VSLA backend service.

To restart the VSLA backend service on Lab Manager:

  1. Log in to the Lab Manager server.
  2. Go to Start > Run and type service.msc.
  3. Right click the VMware vCenter Lab Manager Monitor service.
  4. Click Restart.

When you restart the Lab Manager VSLA service , the DVS becomes unavailable. When the service starts again, Lab Manager gets the latest status from the vCenter Server.

After the Lab Manager VSLA service starts again, you can start repairing the ESX hosts or try re-enable host-spanning within Lab Manager.

===================================================

After restarting this service, I was able to repair our Hosts without issue.

Friday, April 20, 2012

Removing an ESX(i) host from a DvS (distributed virtual Switch)

For some reason the UI makes it difficult to find this option.  It’s not hard to find when you remember where to look.  Go into Home/Inventory/Networking, choose your DvS you want to remove the host from, then choose the “Hosts” tab, then click the host you want to remove and choose “Remove from vSphere Distributed Switch…”

image

Wednesday, February 22, 2012

VMware HA policy restricting VM deployment well before ESXi Hosts have reached capacity.

This can happen due to the default mechanic for slot size calculation in VMware HA.  The default slot size is calculated based on the size of your largest VM in the cluster, and in this example I’m talking about memory because that is generally the first HA bottleneck, not CPU.  If your like me and you have a single large 8GB VM and a bunch of small 256MB VM’s, your cluster admission policy will stop deployments even when ESX host memory usage is below 50%.  To increase your slot size, which you can see here:

image

image

You can see the Slot size is 8332 MB, I’d prefer it was down around 1024 to be closer to reality.

To make the change, go into the Advanced Options of HA

image

And set das.slotmeminmb to a value of 1024

image

Now when you go back and look at the current slot allocation “Advanced Runtime Info” you see that you have gone from 112 slots to 966

image

HA should again work as expected, but you should know that even though this will allow you to essentially overcommit your HA settings and HA working properly for your large VM in a disaster is no longer guaranteed due to the custom settings.

Here is the  text from the vSphere Availability Guide

Slot Size Calculation is comprised of two components, CPU and memory. 

VMware HA calculates the CPU component by obtaining the CPU reservation of each powered-on virtual machine and selecting the largest value. If you have not specified a CPU reservation for a virtual machine, it is assigned a default value of 256 MHz. You can change this value by using the das.vmcpuminmhz advanced attribute.)

VMware HA calculates the memory component by obtaining the memory reservation, plus memory overhead, of each powered-on virtual machine and selecting the largest value. There is no default value for the memory reservation.

If your cluster contains any virtual machines that have much larger reservations than the others, they will distort slot size calculation. To avoid this, you can specify an upper bound for the CPU or memory component of the slot size by using the das.slotcpuinmhz or das.slotmeminmb advanced attributes, respectively.

Wednesday, January 18, 2012

Divide single Dell NIC into multiple NICs, going from 2 to 8 nics per blade Dell Blade Server

I was looking for the Dell equivolent to HP Flex-10’s FlexFabric Adapter.  In dell speak this is called “independent NIC partitioning“ or just “NIC partitioning” or NPAR. 

First let me give you some background into my new system.  It consists of M1000E blade cabinets, M710HD Blade Servers with Broadcom 57712-k 10GbE 2P nics, and PowerConnect M8024-k Cabinet Switches.  My goal is to turn two 10GB NIC’s into four NIC’s made up of two 1GB NIC’s and two 9GB NIC’s

Before you connect to iDRAC, If you want to use your mouse, you must set the Mouse Mode to USC\Diags (also don’t do this through remote desktop)  Make this change from the iDRAC GUI.  I always change the media to attach or I won’t be able to install ESX later.

image

Apply the setting, make sure to wait for the confirmation, otherwise it didn’t happen.

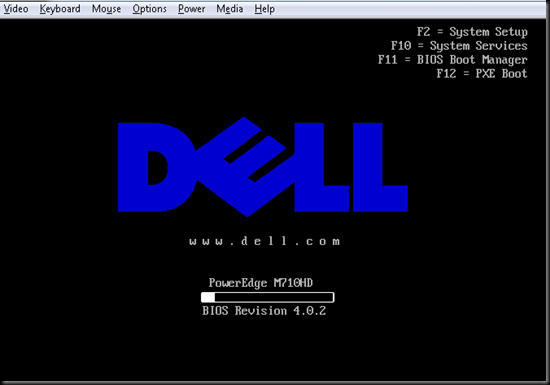
To make the actual NIC Partitioning changes, you must use the ""Dell Unified Server Configurator”, which being the noob I am, I tried to find for download, but apparently you access it during the blade server boot by pressing F10 to access the UEFI (System Services")
image

Then you will see something like this when it boots to UEFI

image

Select “Hardware Configuration”, you can do that with your mouse or the arrows on the keyboard. 

image

Then choose tab over to HII Advanced Configuration

image

You will need to do the following twice, once per nic.

image

Then Device Configuration Menu

image

Change Disabled to “Enabled”

image

After you hit back, you will see a new options, “NIC Partitioning Configuration Menu”, select it now.

image

Then Select “Global Bandwidth Allocation Menu”

image

Tab doesn’t work on the next page, some person decided to make tab only go back and forth between the top row and the back button.  However, luckily you can use your UP and Down arrows to move between rows.

Unfortunately it doesn’t appear you can Partition a NIC into less than 4, I only want 2, so using that methodology I will create one with 90 and one with 10, the other two I will give 1 to because I can’t give them 0.  You are allowed to over allocate the Maximum Bandwidth.  1%=100MB, so the find 2 NIC’s I will create will be 100MB adapters I won’t end up using.

Type in your number, then hit enter, then choose the next row.

HINT: if using the mouse and it gets a bit squirrly, Play with “ALT-C” and toggle Hide Local Cursor on and off to improve mouse response.

image

Choose Back, then Back, then Finish,  It will prompt you to Save, of course say yes, then repeat for your next adapter.

image

After you have done both NIC’s, Choose back, then Exit and Reboot.

Here comes the really fun part.  After installing and booting into ESX, it appears that only the 2nd NIC took the partitioning command as the first one is still at 25/25/25/25 and the second one is 10/90/1/1 correctly.  I made the changes again for the first NIC and rebooted again, and it works.  I verified this over 3 different new blades, if anyone knows the solution, I’d love to hear it.


Credits, I found the information for this article HERE

http://www.dell.com/downloads/global/products/pwcnt/en/broadcom-npar-users-manual.pdf

http://www.dell.com/downloads/global/products/pedge/en/Dell-Broadcom-NPAR-White-Paper.pdf

http://www.dell.com/us/enterprise/p/broadcom-netxtremeii-57712-k/pd

Monday, October 31, 2011

Migrate VM from VMware Server 2 to vSphere ESXi 5

I tried to migrate an offline VM from Server 2 to ESX 5, in the process I kept getting what seemed to be a snapshot error on a VM without snapshots.  The VM would successfully migrate and then give this error on power up, or during the P2V Converter if I chose to remove snapshots.

“The parent virtual disk has been modified since the child was created.  The content ID of the parent virtual disk does not match the corresponding parent content ID in the child.”

I tried about 7 times unsuccessfully to migrate the VM, then a friend suggested I modify the defaults of the P2V and choose HW version 7 instead of HW version 8, and this time it succeeded.

Friday, June 17, 2011

Moving a vCenter server into a EVC cluster.

It’s a catch 22 scenario, you want to run your vCenter server in a cluster with EVC enabled, but you can’t build/manage a cluster without vCenter running so here is how you do it.

1) Build vCenter  on ESX server 1

2) Build a cluster in vCenter, enable EVC and place ESX Server 2 in that cluster.

3) Power down vCenter Server(s),. open vSphere client, connect to ESX server 1, remove the vCenter VM(s) from inventory (DO NOT delete from disk). close vSphere client

4) Open vSphere client, connect directly to ESX server 2.  Browse the datastore for the vCenter VM(s).  Connect to them, power them up.

5) You can now connect to the vCenter and move ESX server 1 into the EVC cluster.

Tuesday, March 23, 2010

Problems with P2V of a physical server

The Server is a fully patched 2003 Server. P2V should be working, everything is full 1GB, all drives are NTFS, nothing funny. I'm doing this all hot by the way, no cold booting, its a production server with no downtime allowed. Each P2V attempt died near the end, it takes several hours, so I was never watching exactly when it died. Checking the logs on the client at C:\Documents and Settings\All Users\Application Data\VMware\VMware Converter Enterprise\Logs\vmware-converter-agent-2.log . Shows me the error :

"Image processing task has failed with PlatformError fault: (1117) The request could not be performed because of an I/O device error.".

Obviously this indicates an I/O error. After some searching I found an interesting fact, if you maintain the size of the original drive the P2V or "import machine" will do a block level copy, and if there are bad blocks, then you can get this error. So if you change the destination drive size, it does a file level copy instead. There is a chance that this server's hard drive has bad blocks, but honestly I don't know. It's an old server, that's why i'm P2Ving it. After making a change to the destination partition size, this fixed my issue and the P2V was finally sucessful.

FYI, this was all done with the latest software, ESX 4.0U1, VC 4U1, etc...